Space Dunk Initial Blog Post

This week I returned to Champlain College for my final semester, last semester I worked on a game that was cut and now I have joined a new team working on a game called Space Dunk. Space Dunk is a first person competitive multiplayer sports game that takes place in zero gravity arenas. The Space Dunk team asked me to join them to help them create more levels. During this first week we met and talked about what the teams goals for this semester are and what they wanted the new members to focus on. We discussed each of the mechanics that are already implemented and then talked about what mechanics we wanted to add this semester. I spent a lot of time this week doing research into different sports to help inspire my level design. The first thing I did was research real sports like Golf, Football, and Basketball, I wanted to know what made these games compelling. I honestly don’t watch sports but I have several friends that love professional sports and I talked extensively with them. I also looked at other sports games that are not realistic like: Rocket League, Unreal Tournament’s Bombing Run game mode, and Griff ball.

I started conceptualizing a bunch of different ideas I have, at this point in the development process I just wanted to create as many ideas as possible. I showed the list of all the level concepts to the team and had them tell me which ones they liked the best. Now that the list is narrowed down I am going to start sketching out a few different concepts and try to figure out what assets each level will need. The team is in constant communication at this point in the process and its really exciting to see the excitement that everyone has for this project.

Joining a New Team

The Senior Capstone class at my college (Champlain College) is set up so that after the first semester half the teams working on games are cut and added to other teams who are also working on their own games. My team was unfortunately cut however I was given an offer to work on a game called Space Dunk.  The team liked the level design work I did on Korku and wanted me to do level design work for them, I accepted their offer but it got me thinking about what its like to join a new team and work on another persons creative property. I would like to use this blog post to talk about the integration process to hopefully give people in the same situation some ideas about where to start .

Meeting the Team:

The first meeting we had as a new team was very helpful, we talked about what the original members of the team wanted the new members to focus on. I had the advantage of going to class with many of the members of my new team so learning everybody’s name was easy. I asked the team to see their design documentation so that I could familiarize myself with the game systems, if I want to design good levels I need to know how the game works inside and out. After everyone was acquainted we decided to hang out as a group to get to know each other better. We went to a bar and talked for a while, it was a very friendly environment and I really recommend doing something similar to this (although it does not have to be in a bar). By meeting everyone in a non work environment it was easy to get to know each other without the pressure associated with a formal environment. The meeting was a very helpful way to get acquainted with the team and I am super excited to work with them further.

Adding Members:

I have had experience with getting new members on a team that I have been working with. The last game I worked on was originally a team of five and grew into a team of ten. The biggest tip I can give to teams that are getting new members is to be open to changes they want to make. New members of a team are always worried about making too many changes and stepping on the original team members toes, however a new set of eyes on a project can open up doors the original team did not even think about. Even if you don’t like an idea show them that you are grateful that they are trying to help make the best game that can be made, if you make someone feel uncomfortable about speaking early on they may not bring up good ideas later in the project.  When I had new members join my team last year I was worried that my vision for the game would be changed but I was pleasantly surprised with the awesome ideas they contributed to the game.  Working on new teams can be a scary experience but it will help you grow as a designer and as a teammate.

Designing Weapons

When designing a shooter game creating fun and interesting weapons is one of the most important parts of the design process.  The weapons are going to be used by the player for the entire play experience so they better be compelling and fun to use. When designing weapons there are a lot of details that need to be considered for example: how many weapons the player can hold at once, if the weapons have alternate fire modes, what kind of ammo does the weapon use, and how much damage it does.

Less is not always More:

There are a lot of things to take into consideration when deciding how many weapons the player can carry at once. There are advantages and disadvantages to each method and its important to pick the one that supports you game better. Many modern shooters (such as Halo, Call of Duty, Destiny, and Gears of War) limit the player to only a few weapons, this allows for a more realistic feel since in real life a person can only hold so many weapons. The limited weapon method also allows for more resource and choice driven game play, the player only has a few weapons so when they start to run low on ammo then they are forced to search for more or get rid of the weapon. The limited number of weapons also creates player choice since the player can’t hold the entire arsenal they have to make choices about what weapons they want to hold. The player may need certain weapons to get past certain areas so they are forced to drop a weapon they are holding. On the other side of the coin is letting the player hold the entire arsenal, this method was used a lot in older shooters (such as Doom, Half-life, and Quake). The advantages of allowing the player access to the entire arsenal is that it allows them the freedom to approach each combat situation the way they want to. The big draw back of this method is that it becomes very important to balance each weapon so nothing is too overpowered. Each of these methods can improve the experience of a shooter if its used in the right way.

Fire Modes:

When designing weapons one way to make the weapon more interesting is to give it multiple fire modes. This allows a weapon to have more versatility in combat. There are many games that have weapons with alternate fire modes such as: Bulletstorm, Unreal Tournament, and Painkiller. Different fire modes create the opportunity to make a weapon more memorable, or help compensate for the weapons short comings. In the game Unreal Tournament there is a weapon that shoots a fast beam projectile but the alternate fire shoots a slow moving ball, if the ball is shot by the primary fire the projectiles explode for extra area damage. The alternate fire does not need to be a different projectile, in the game Perfect Dark Zero there is a weapon that has an alt fire that turns it into a turret. Weapons with multiple fire modes give the player more options of how to deal with enemies and in a shooter the more ways the player has to deal with the enemies the longer they stay interested.

Weapon Design In KorKu:

The weapons in KorKu were designed around the level and the enemies. We wanted a long range weapon so I created a laser that had a slow rate of fire but had long range and high damage. The laser was the most popular weapon in testing due to its accuracy and damage. The other weapon the pilot has is the shotgun, this weapon has a high rate of fire but lower damage. This weapon was harder to aim but the spread allowed player to shoot multiple enemies at the same time. The second player had one weapon which was a heavy weapon on the shoulder. This weapon did the most damage but the projectile moved slow so the player had to lead their targets.  We designed this weapon to he harder to use but very satisfying when it was mastered. The cannon could kill any enemy in one shot but hitting that enemy was another story, this created a challenge for the second player to master in order to succeed in combat.

The Devil is in the Details

Designing games is one of the most fun things you can do, however many people don’t realize how many tiny details need to be tweaked and iterated on. One of the things that my team and I worked on a lot is the targeting reticle. A reticle is and UI element that is used in video games to show the player where they are aiming their weapons. The reticle may seem like a small detail but if the reticle does not read well the shooting will not feel as refined. It was a really interesting experience working on a reticle and I wanted to share it with all of you.

Research:

I decided to look into other shooter games to see how they handled their reticle design. The first games I looked at were other mech games such as the Mechwarrior series and Chromehounds. The biggest thing I gained from looking at games like this was that most of the reticles were designed to look like targeting systems that are found in modern fighter jets. The look in games like this is supposed to remind the player of military equipment, this is due to the fact that the game wants to give the experience of being in a futuristic military setting.  A lot of the more modern shooters have much more simple designs for their reticles. Many games want to keep the UI as minimal as possible to make their game more realistic.

Designing for Korku:

When designing the reticle for Korku my artist and I first started by talking about the kind of sights that would be found on WW 1 artillery. My artist created a bunch of different ideas for the reticle and as a group we discussed the pros and cons of each design.

img_20151111_165422_1024 This picture shows the first pass on the different reticles. The biggest complaint with our original reticle is that it was very large and did not feel like it was accurate. We quickly decided that each player would have a different reticle depending on what role they were playing (Pilot or Engineer). The pilots reticle ended up being the square one in the bottom row. Since the pilot had a shotgun we wanted something that showed where the spread was going to go. The final design for this reticle did not have the dots in it, we felt that the dots gave players the wrong idea about where each shot is going to go. The design that we picked for the engineers reticle is number 12, the engineer had heavy cannons as their weapons and we decided that we wanted a reticle that looked like an old artillery sight.  We made a few changes to the original design, we wanted the bottom of the reticle to come together like a V, the dot in the middle was where the bullets were going to go and player responded really well to it.

Conclusion:

The biggest lesson I learned from designing a reticle is that the first thing to do is decide what kind of weapon the reticle is representing. If the weapon is very accurate you probably want a small reticle, if the weapon is futuristic you may want to help show that with the design of the reticle. The biggest thing to remember is that if the reticle does not read well the player will feel like the weapon is not very accurate. The reticle may seem like a small detail that will go unnoticed but its going to be something the player is looking at the entire time they are playing your game so it is important to make it interesting but also useful to the player.

Project Update

I have been using this blog to discuss different design practices based on what I was working on for my Senior Capstone game, this update will show where the game has gone from the beginning of the semester. The team I have been working with has been hard at work creating an interesting co-op mech experience that is as fun to play as it was to make.

Humble Beginnings:

MechGIF_1

The gif above shows the game at its earliest playable form, at this point in the project we had basic movement and shooting as well as the radar set up. This version of the game was pretty rough but it was just a proof of concept so most of the mechanics had not been developed yet.  As the game advanced we added a second player to the mech which created one of our biggest game mechanics. One of the biggest hurdles that we had to overcome was getting the shooting to feel satisfying, in this early build when the player aims the targeting reticle it moves around the screen as opposed to most FPS games where the reticle is locked and the entire screen moves when the player aims. When we finally got aiming feeling satisfying it felt like an entirely different game. The next big task the team needed to overcome was dividing up the tasks that each player will have to complete to be successful. We used QA testing to help us narrow down what the tasks could be and how to best divide them. We ended up taking the two most popular divisions and combined them together to make our current gameplay.

Bringing the Experience Together:

As the semester went on we started focusing on making changes to our established gameplay to make the game feel more interesting. One of our mechanics was a buffing system where the second player could route power to different systems in the mech to aid the first player in combat. The mechanic started out as a puzzle style game as you can see from the gif below.

MechGIF_3.gif

The system was based around rotating arrows to direct power to the nodes (the squares with circles inside). We wanted the second player to focus more on combat so we decided to make the system more of a resource management system. This not only streamlined the gameplay for this mechanic but we also found through testing that it was more popular with the players.

Engineer

The new buffing system was easier to understand and looked a lot cleaner. We spent a lot of time getting this system looking right and feeling right. I spent a lot of time at the end of the project balancing all the different buffs to make sure none of them were too strong or too weak.

Final Push:

In the weeks leading up to the final presentation the team was working on getting all the final tweaks into the game. I spent my time working on level design with my artist Kody. I was given a lot of objects that I could populate the world with to give it a more realistic feel.  I would make changes to the level and then I would send them to Kody of feedback, he would give me ideas about how to better use the play space. The picture below shows some of the feedback he would give me.

citylayout3_1024

The communication between the art and design disciplines made making changes to the level easy, I also feel that it never hurts to have a second pair of eyes looking at a problem never hurts. We also added a lot of our art and animations in during our final push, this not only helped our game space feel more realistic but it also helped give the players more feedback. The team really came together in the last few weeks to make a product that everyone is really proud of.

 Conclusions:

Our game did not move forward into the next phase of senior production but we did come a very long way from our game’s humble beginnings. The team worked really hard on this game and I have a feeling that this is not the last time people will be hearing about Korku. Check out the gameplay video below to see what the final version of the game looked like.

https://www.youtube.com/watch?v=HLH8XjeWh2w


Designing UI

While working on my Senior Capstone I have been doing a lot of work on designing UI. For anyone not familiar with game design lingo UI is short for User Interface, there are many things that can classified as UI but most of the time UI refers to any element that tells the player something about their stats for example: health bars, ammo counters, and speed gauges. There are many types of UI and deciding what type of UI to use depends on what kind of game experience you want the player to have. Designing UI may seem like an easy task but UI is one of the most important ways the player gets feedback so it is important that a game has clear UI that does not clutter up the screen.

Getting Started:

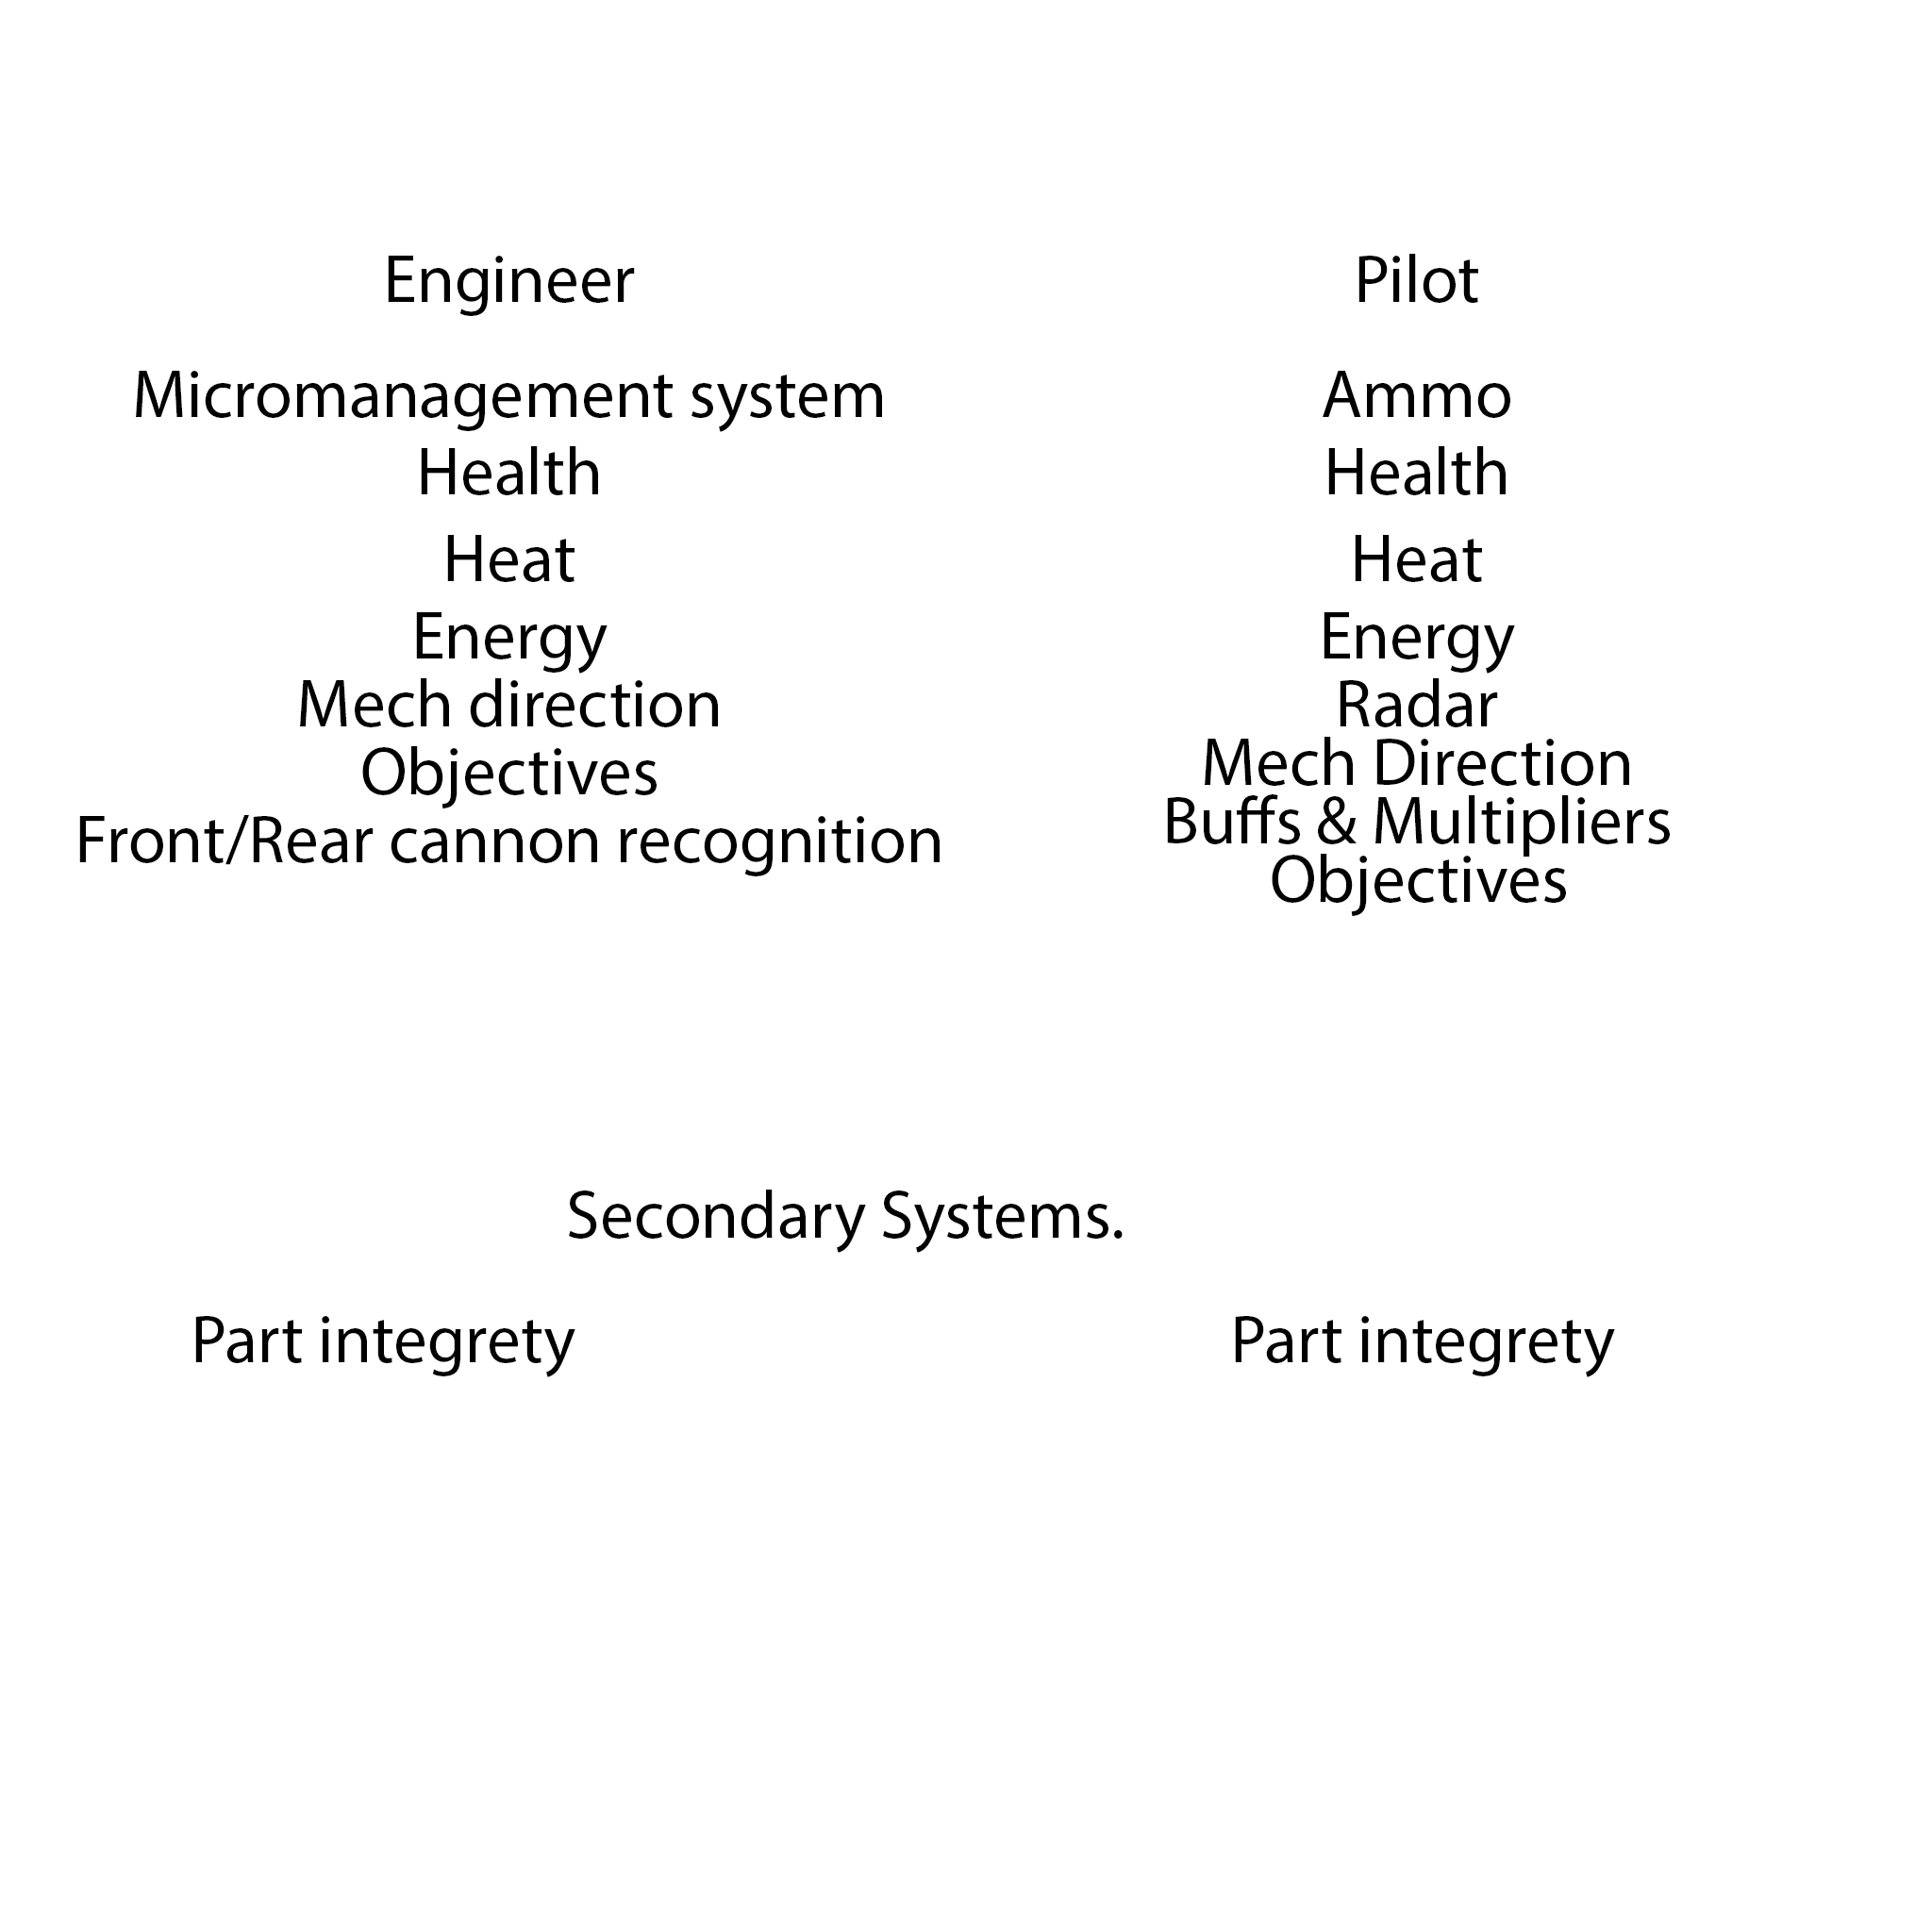
When starting to design UI the first thing I like to do is make a list of all the mechanics that require UI elements, this gives you an idea about how many different UI elements you are going to need. Once I have figured out what UI elements that I am going to need I organize them based on how important they are to player feedback. The image below is the list that I created with my artist for our co-op mech game, we made a list of what each player needed to see and organized it by importance.

UI

When this list is complete I begin thinking about what type of UI will best fit each element. There has been a lot of research done on type of UI and currently it is accepted that there are four types of UI which are: Diegetic, Non-diegetic, Spacial, and Meta. Each of these types of UI are useful for different game play experiences and I will discuss what types of UI work better for different games.

Diegetic:

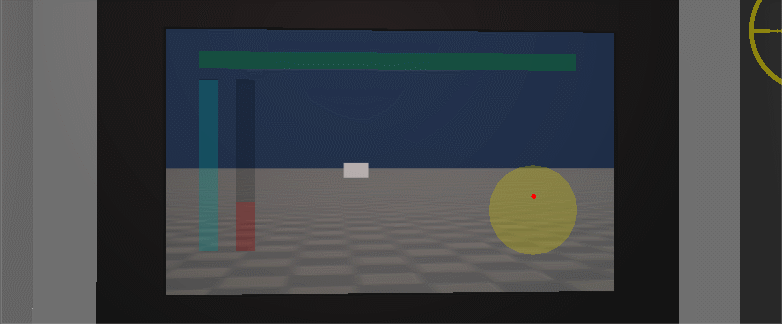
Diegetic UI is a UI element that is in the game world (the player character would be able to see it) an excellent example of this is in the Dead Space games. The main characters health is displayed on his back so the player can always see it, all the other UI elements are also on the characters armor so the player can always see their stats but the screen is not cluttered by the UI. Diegetic UI works really well in horror games because it doesn’t clutter up the screen giving the player more room to see whats going on around them. Games that have a heavy focus on realism are also good choices for diegetic UI because the UI elements being visible to the character makes sense.

Non-diegetic:

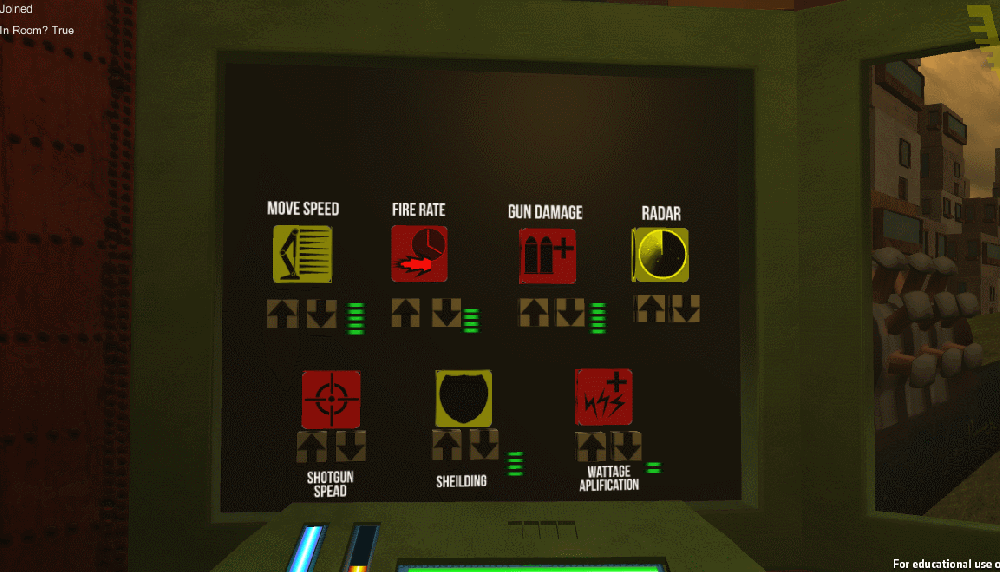
Non-diegetic UI is the most common form of UI and it refers to UI elements that only the player can see. A good example of non-diegetic UI is World of Warcraft. This form of UI is useful in FPS and RPG games since the player has a lot of stats to keep track of. Non-diegetic UI is good for player feedback because the player can always see what their health, ammo, and other stats are at. The drawback of this form of UI is that the screen can get cluttered if there are a lot of UI elements, it is very important to be aware of how much of the screen is devoted to the UI.

Spacial UI:

Spacial UI is a UI element that exists in the game world (like diegetic) but the player’s character does not see it, an example of this is in Left 4 Dead the player characters have outlines around them that can be seen through walls. Spacial UI is commonly used to complement other UI elements, like in Left 4 Dead the players heath, ammo, and equipment is Non-deigetic but the players are outlined using Spacial UI.

Meta:

Meta UI are elements that are not spatially visualized for the player the most common form of meta UI is in the Call of Duty series the player has non-diegetic UI for their ammo and grenades but meta UI for their health (the screen gets covered with more and more blood the closer the player gets to death).

Conclusion:

Once you have decided what form of UI you want and what systems need UI you can begin creating the UI assets. While working on my Senior Capstone I worked with my artist a lot creating UI elements that are easy to read and understand. Don’t feel like you are limited to a simple bar either there are many different ways to make interesting and unique UI elements. Remember that UI readability is the most important aspect of UI design, if the player can look at a UI element and not immediately know what it represents then you have done something wrong. Finally the last piece of advice I have is to not be afraid to combine UI elements from multiple UI types, many games have diegetic elements along with Meta elements. The beauty of game design is that there are no real rules just guidelines so feel free to explore when creating UI elements.
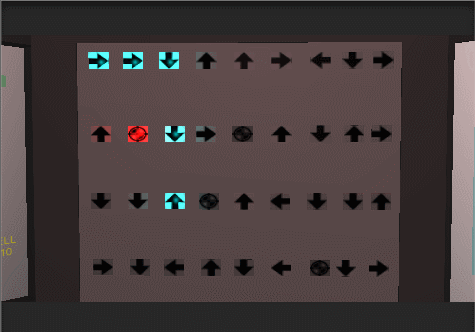
Designing Cooperative Mechanics

This week for my senior capstone game I have been working on designing mechanics for our cooperative mech game that would cause the players to have to work together. There are lots of games in the current market that have heavy emphasis on cooperative play games like Left 4 Dead, Evolve, Borderlands, and Destiny. Co-op play is not a new concept and with the advent of online gaming it has only gotten more popular, however the question remains how does a designer get players to work together?

Enemy Types:

One of the most popular ways to get players to work together is to create enemies that can incapacitate a player. Left 4 Dead does a great job of this, in Left 4 Dead 2 four out of the eight special zombie types incapacitate a player with their attacks. When one of these enemies attacks a player they are unable to move or fight back until an ally kills the enemy, this encourages players to stick together and heal each other because a lone player can easily be picked off. Another game with great examples of enemies that force players to work together is Army of Two. Army of Two is a game created from the ground up with co-op in mind, there are many types of enemies that have heavy armor in the front this creates a need for the players to flank. One player usually draws the enemies attention while the other player shoots their weak spots.

Character Classes: 

Another popular way to encourage teamwork is to create different character classes for the players to pick. This allows the designer to create objectives that only certain classes can complete, if the players know they need a certain person alive to complete the level they will work together to protect that player on the way to objectives and while they are completing objectives. When each player is a different class they bring more tactical options to the table and this creates a symbiotic relationship. In the game Resistance 3 there is a co-op campaign where each player has different abilities one player can heal others but they don’t have many offensive capabilities so it behooves the other players to protect the healer so they can last longer.

Puzzles:

Some games use puzzles to encourage co-op play, games like Portal 2 have co-op campaigns that are all about solving puzzles as a team. This method can be a very good way to encourage teamwork, the players will not be able to progress further in the level until they work together to solve a puzzle. The danger of this method is that if one player has done the puzzle before they can just tell the other player what to do and that eliminates the need to really work together.

Conclusion:

The methods I discussed above are by no means the only way to get players to work together, there are tons of other ways to get players to cooperate. When I was thinking of ways to encourage player teamwork in my senior capstone game I looked at a lot of co-op games and how they solved this problem. One of the mechanics that I came up with for my game was to have a super powerful weapon that requires both players to maximize its effectiveness. The pilot fires a slow moving projectile that deals average damage, the engineer can then shoot the projectile to make it explode dealing high area of effect damage. This encourages communication and rewards the players for working well together. I also created a mechanic where the engineers UAV has to be refueled by the Pilot. The UAV is very useful in combat and its in the pilots best interest to keep it fueled so that it can keep scouting and supporting the pilot. When designing co-op mechanics the biggest thing to remember is to make sure both players feel equally powerful, if one player feel less powerful then the other then they will get frustrated and not want to continue playing. If any player does not feel like they are contributing to the team then they won’t see the point of playing and as a designer you want to keep players invested as long as possible.

Creating Visual Design Documents

When making video games, creating documentation is a very important part of the process. Documentation can be helpful in many different ways such as documents can be used to help keep the team on the same page about design changes, they can also be used to help explain game play to investors or publishers, and can also be used to help you arrange your ideas and think about the game in different ways. Personally I like to start making my visual design docs by sketching out some ideas, sometimes I will sketch out three different layouts that I may use and sometimes I have writers block and I just doodle. Even if I don’t come up with something I can use later this process helps me get in a creative mindset and also allows me to get any of my basic ideas out. After I’m done drawing I start doing a digital block out of my document and at this point I decide how the page is going to be laid out and how much space I will need for each thing I want to talk about. I will write a headline for the mechanic or game feature I want to talk about then I create a large square to represent how much space I need on the document to talk about that feature, this gives me an idea about how big the document needs to be. Once I have the whole document blocked out I finish up my first pass by adding art and any text I need. After the document is finished I always show it to the team for feedback, its always good to show it to at least an artist since they may have some suggestions on how to change the layout of a document to help with flow. When the team is finished giving me feedback I go and make the changes and the document is done. I really like making game design documents, it forces me to think about how all the mechanics work together and it gives me a way to show the rest of the team what my design plans are.

Creating A Paper Prototype

Creating paper prototypes can be a very important part of game design, depending on your game it can be a quick and easy way to test out game mechanics. My team is currently working on three prototypes for different games, two of them are digital and one is a paper prototype. I have been spearheading the paper prototype and at first I was having a bit of trouble figuring out what to do. I decided to ask my team what features they wanted the prototype to show off. I was told to emphasize: resource gathering and management, the feeling of a big journey, and stealth. Once I figured out what features to focus on the process became much easier, I started working on the crafting system and creating a scenario that would allow the player to experience all the different features that the team told me to highlight. Using a grid and tokens I was able to create a movement system and item searching system as well as a stealth system. I had a meeting with one of my design professors and he gave me some really good advice about paper prototypes which was: make sure you show how the player could lose. Paper prototypes are not the best way to go for every game you may want to pitch but they can help you think about your game mechanics and flesh them out in ways that are unexpected.