Level Design Masterpieces 3: Fish in a Barrel

Summary:

The Gears of War series has always been a personal favorite of mine; the mixture of smooth frantic combat, interesting encounters, and over-the-top violence. The first GOW game may not have invented cover based combat but it did popularize it and create arguably the most refined version of it to date. The GOW games also have really good level design, the developer, Epic games have a history of marvelous level design (Cliffy B the lead designer on GOW created some of my favorite Unreal levels but that’s a blog post for another day). In previous blog posts I have talked about using level design to teach players about the game they are playing, in this post I want to talk about another aspect of level design: testing the player. One of the most common ways to test a player is a boss fight but it can be accomplished with a combat encounter. Two combat encounters I want to talk about are from the first chapter they are: Fish in a Barrel and Hammer.


Walk through:

Fish in a Barrel:

Fish in a Barrel starts with a cut-scene where the main characters are searching the remains of a group of soldiers looking for a device. The players squad is ambushed as the cut scene ends and the player is instantly at the mercy of a group of locust with a turret. The turret is to the left of the player and due to the lack of cover a direct attack is almost impossible. There is a way to flank around and easily kill the locust and this first part is just reinforcing what the game has been teaching the player up to this point (stick to cover and flank).

LevelOpening

The direct approach is not advised

Once the guy on the turret and his friend have been dealt with the player can jump on the turret to deal with the reinforcements. Once the player wipes out the remaining locust forces they are free to move onto the next area which gives this chapter its namesake. The player enters a courtyard with an empty fountain, they must use this as cover while they are attacked by all sides by a large locust force.

FixedFountainGif

It doesn’t stay peaceful for long…


This section really acts as the first real test of the players skills, up to this point the game has only really thrown small groups of locust at the player now, they have to contend with the largest group they have encountered. The player has also been taught about e-holes (holes in the ground that the enemies come out of) and now they have four of them in the same area. There are grenades in the area so the player can close the e-holes, and while it is possible to keep fighting until the holes close on their own its very unlikely especially for a new player or someone on the highest difficulty.

FountainFight


Another way this area tests the player is by putting them on the defensive. Almost all of the combat up to this point in the game was at medium range with the player advancing and flanking. By putting the player on the defensive and not giving them a way to flank the enemy this area is truly a test of the players skill in combat. All of these aspects blend together to create an encounter that truly is a test of everything the player has learned.

The final aspect of this encounter I want to discuss is how an expert player can bypass this entire encounter if they know what to do. If the player times it right they can close all the e-holes before any of the locust can spawn. This allows the expert player to avoid the entire encounter which is really just a way to test new players.

Clusterluck


Hammer:

The Chapter Hammer introduces a bunch of things to the player. Not only does the game introduce a new character (Augustus Cole who is a fan favorite in the series) it also teaches the player how to use the Hammer of Dawn. The Hammer of Dawn is a weapon that calls down an orbital laser which annihilates infantry and is the only way to kill certain large enemies. The one drawback of the weapon is it takes a few seconds to charge and it can only be used outdoors.

Hammer

Seeders can only be killed with the Hammer of Dawn

The encounter I’m going to break down in near the end of the chapter where the player must fight a Seeder (a large enemy that can only be killed with the hammer). This encounter takes place in a square two story room. The second floor is where the player is confined to along with several locust soldiers and wretches. The first floor has a Seeder (a large enemy that can only be killed by the Hammer of dawn) and while this is not the first encounter with a Seeder this is the first one the player must fight with contending with other enemies.

EnterHammerZone

The whole area loops around insuring that nowhere is safe for long

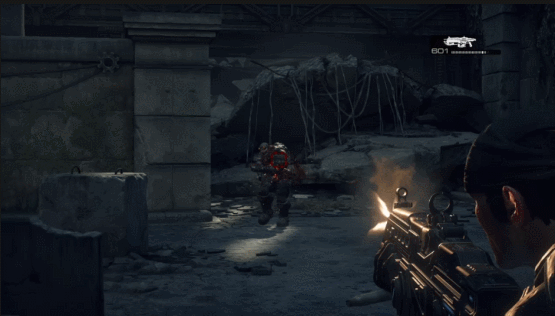
This area is a great test for almost everything the player has learned during this chapter. The player must not only fight the locust with guns but also the wretches at the same time, since wretches are fast moving melee attackers the player is being pushed out of cover. The Seeder also has slow moving projectile that the player can shoot down, all of this creates a encounter where the player has to understand all the enemy types and decide what to prioritize. The area the player is confined to is small and circular but there is lots of cover, there are many ways the player can flank the enemy and also get flanked.

HammerRoomDeath

Ranged enemies wear you down then the melee attackers finish you off


Conclusion:

Chainsaw

You can’t show Gears footage without at least one chainsaw kill

In the years following the release of Gears of War the game would get multiple sequels and amass a huge fan base. The Gears of War series is now one of the biggest Xbox exclusives and I plan on revisiting this series again in another level design blog. The first Gears game is an awesome example of show not tell game design, the game does a good job of slowing adding layers to the combat while still constantly testing the players on what they just learned. Throw in a unique ascetic and challenging combat and its no wonder why this series is still played and talked about to this day.

Level Design Masterpieces 2: Barrels O’ Fun


Summary:

The Doom series was created by ID Software and it is widely considered one of the first games in the FPS genre. ID Software created the first Doom game in 1993 and Doom 2 was released in 1994. Doom 1 and 2 were extremely popular and for years most FPS games followed the game play model of Doom. In Doom the player is a marine on a military base on Mars, the base gets attacked by demons and the player must journey to hell to stop the demons. The player explores levels finding keys to open new areas and fighting monsters. Combat is fast paced and brutal, the player can carry all 8 weapons at once and no weapons need to be reloaded. The enemies either launch projectiles at the player or rush at the player to melee them.  Doom is also characterized by having lots of secrets hidden in the levels.

Walk through:

Barrels O’ Fun is the 23rd mission in Doom 2, this is later in the game and the player will have mastered a lot of Doom’s mechanics. While most levels in the game are about hunting down keys and fighting huge swarms of the undead this level requires the player to rethink their play style. The level is littered with explosive barrels that can easily kill the player or enemies, and many areas have so many barrels that when one explodes it sets off a chain reaction and the entire room ends up exploding.

At the start of the level the player is in a long room filled with barrels but suspiciously free of daemons. Once the player starts moving a wall opens to reveal a Mancubus and a shotgun. When the Mancubus fires at the player it will start a chain reaction of explosions from the barrels which will kill both him and the player.

DoomBOF1.gif

Move or be destroyed!

The player must run across the room and reach a teleporter to be brought to the next area however, the barrels are set up in such a way that the players movement is impeded. As you can see in the gif below the player is guided to the end of the room by a burning barrel that does not explode.

DoomBOF2

Run towards the light!

Once the player reaches the teleporter and enters the next area their situation doesn’t improve much. The player finds themselves behind two hell knights and looking down a long hallway. Just like the first room the player must run to the other end before the attacking enemies start a chain reaction of explosions. As the player runs down the corridor they discover that there are several chaingun zombies. When the player reaches the end of the corridor there is another teleporter. This room is easier then the first room since the player has a more direct route, and smart players will backtrack to pick up the dropped chainguns as well as the level map once all the monsters are dead from the explosions.

DoomBOF3.gif

Clearing a room the easy way

The next area changes things up a little bit, the player is teleported to a narrow corridor that still has explosive barrels but they are not set up in a way that if one explodes it won’t start a chain reaction. At the end of the corridor is a button guarded by a Pain elemental, a flying enemy that spits out lost souls (another enemy). If the player does not deal with the Pain elemental they can easy be overrun by lost souls. The area this encounter takes place in is really what makes it so interesting. The long narrow hallway makes it harder for the player to move and dodge, this makes the lost souls fast movement and charging attacks harder to avoid, and the barrels scattered in the area ensure the player can’t spray and pray. The last interesting thing about this area is the wall on the right side of the corridor rises to reveal that your above the starting room.

DoomBOF4.gif

I accidentally fell off the platform at the end

Once the player hits the button at the end of the corridor they must backtrack to the starting area and ride a platform up to a corridor that is similar to the one with the Pain elemental. This hallway is designed like a cross-section of a staircase and has as line of explosive barrels at the “top”. The player only has to kill a few Demons and Imps while working their way to the end of the corridor, this acts as a respite from the combat (or at least the Doom equivalent of a respite). When the player reaches the end of the corridor they enter a much more open area with a few alcoves full of enemies. The player is on a platform surrounded by lava so they can’t directly reach the enemies however, there is a rocket launcher on the center of the platform.

DoomBOF5.gif

Taking out the Chain gun zombie is always top priority 

Once the player deals with the enemies in the alcoves and picks up the rocket launcher they have a choice, there are two teleporters in the lava below the player. I am going to explain the right side teleporter path first ( but they can be done in either order). When the player exits the teleporter they end up in a circular room with two hallways that lead into each other forming a U shape. While walking around the hallways the player will see an alcove with a few imps and a bunch of rocket launcher ammo. There is also a secret hidden in the wall as you can see from the gif below.

DoomBOF6.gif

The are more rockets in the alcove I didn’t pick up

When the player enters one of the tunnels it triggers the release of a few Spider Masterminds (one of the most deadly enemy types) and opens a room with a yellow key and a teleporter. This teleporter sends the player to the same place as the teleporter on the left does in the previous area. After fighting a Revenant the player will discover a BFG 9000 and a few Demons, once the enemies have been dealt with the player will enter another teleporter and be brought to an inside area.

DoomBOF7.gif

When ever I pick up the BFG my face mirrors the Doom guy’s face

This final area will be reminiscent of the beginning of the level, the player is in a room full of explosive barrels. There is a chain gun zombie behind the player and once it starts shooting all the barrels in the room will start exploding. The player must run to the other end and get through the door before the explosions finish them off. Once the players are in the next room there is a teleporter that loops back to the big open area of the map. The other door in the room requires a yellow key. Once that door is open there are only a few barrels that the player has to blow up that are blocking the exit for the stage.

DoomBOF8.gif

The mad dash to the end of the level

Conclusion:

Barrels O’ Fun is one of the most memorable levels in Doom 2 and it was created by Richard Gray aka Levelord. Grey worked on many very popular 90’s shooters such as Duke Nukem 3D, Sin, Blood, and Quake. The reason this level works so well is that Grey understands the pillars of Dooms gameplay and uses this map to make the player rethink the way they have been playing the game thus far. The pillars of gameplay for Doom are: fast movement and massive firepower, this level takes both of these pillars and turns them upside down. The player still needs to be constantly moving like in other Doom levels but the abundance of explosive barrels forces the player to take a little more care in their movements. This level also forces the player to be more careful when shooting which on paper my seem like sacrilege to hardcore Doom fans but I feel its one of the reasons this level is so fun. One last interesting aspect of this level that really shows why Grey is such a great designer is how its created to challenge speed runners as well as regular players. There was (and still is) a large community of speed runners playing older shooters like this, there was even a par time for each level set by ID. As mentioned above there is a point where the player has to jump off an edge and they end up back in the starting room. There is no guarantee that the Mancubus will shoot and set off all the barrels the first time the player is in the room (If the player is trying to do a speed run and they immediately start sprinting away from the Mancubus as soon as the level starts there is a good chance it won’t notice them). This creates a hard decision for the speed runner do they set the barrels off? (this will cost valuable time) or do they ignore it and just dodge the Mancubus and barrels a second time? (quicker but much more dangerous). This kind of thinking really shows that Grey understood the Doom community and wanted to challenge every part of it.

I hope you enjoyed my look into Barrels O’ Fun, thanks for taking the time to read this. If you think I missed anything or want to agree or disagree let me know what you think in the comment section.

Level Design Masterpieces 1: Lowlife

Summary:

The Half Life series is one of the most popular game series or all time, the original Half Life is a PC gaming classic and the sequel was the highest rated game ever in PC Gamer magazine. Tons of people remember Half Life 1 & 2 and many people remember Half Life 2 Episode 2 due to the cliffhanger ending, but many people overlook Half Life 2 Episode 1 and that’s a shame. First a short history lesson, Half Life 2 came out in 2004 as a follow up to the 1998 shooter Half Life. Due to the long development cycle between Half Life 1 and 2 Valve decided to release the sequel to Half Life 2 in 3 episodic expansions packs. The idea was that Valve would be able to produce the episodes faster then a full game because they were smaller. Half Life 2 Episode 1 was released on June 1, 2006 and despite its short length it was widely considered a success.

Half Life 2 Episode 1 didn’t add a lot of mechanics to the Half Life formula, it added a new enemy type and gave the player an AI partner for the whole episode. The new enemy is a zombified version of one of the other enemies you face in the game. This zombie can take more damage then any of the other zombies and at low heath it will pull out a grenade and kamikaze charge. The other change to game play is adding Alex Vance as a permanent partner. Alex can assist in combat and open doors for the player, she can’t be killed so the player does not have to focus on protecting her.

WOW! Okay, finally its time to talk about the level itself! Lowlife is the third of five chapters in HL 2 EP 1, the first two chapters are used as quick refreshers on the controls and combat, so the third chapter is when they start to really test your combat skills. It’s important to know that at the start of this chapter the player only has the gravity gun ( a weapon that uses objects in the environment as projectiles) so they can’t just run and gun.

Walk through:

The chapter starts with the player moving through some rubble, they get a view of the tunnel they are about to pass through and attentive players will notice zombies on the ground waiting to rise up and attack the player. As the player enters the tunnel the first wave of zombies gets up and attacks.

HL2EP1.gif

First zombie encounter

As the player moves down the tunnel they encounter a few more zombies, there are also mines on the ground that the player can use against the zombies. In one of the more well lit areas a zombie will stand up right next to a mine and the mine explodes. This shows the players that the mines can be dangerous but can also be used in combat. Before exiting this area there are also zombies on fire showing the player that fire can kill zombies (this becomes very important later). The next room is pitch black and the player must use their flashlight to find a vent, there is a audio que from Alex prompting the player to turn on their flashlight and explore the vent. This ensures the player knows that they have a flashlight and knows to look for vents (which is a big part of exploring Half Life levels). All of this early teaching is to ensure that players who might be rusty or new know everything they need to. This is done organically without feeling forced. When moving through the vents the player finds a flair that can be picked up with the gravity gun, the flares can be used to create light and set enemies on fire. When the player exits the vent they have to fight an enemy  and the hope is that the player will throw the flare at the zombie setting it on fire and learning that flares can be used in combat.

The player then encounters the first puzzle, there is a locked door and the player has to shoot the lock off but they need a gun since the gravity gun can’t break the lock. As shown below the player uses the gravity gun to grab weapons that are out of reach, the player can use these weapons to break the lock.

lock.gif

Lock and Load

The player progresses down another tunnel fighting zombies on the way. The area is very dark so the player must use their flashlight sparingly, but light can be generated by setting zombies on fire. At the end of the tunnel the player encounters a locked door, on the other side of the door the players can see the new zombie enemy. This is the first time the player has ever seen this enemy and the game teaches the player that this zombie can kamikaze by using the explosion to open the locked door. The player then fights through another tunnel fighting more zombies, the kamikaze zombies start showing up along with regular zombies to increase the challenge. The player then enters a room with a hole in the floor and a broken car. The player must hold a button to open the door to the next area but when they start to open the door they are attacked by giant bugs called antlions. The antlions endlessly spawn from the hole in the floor and the player must use the gravity gun to block the hole. This teaches the player how to stop antlions from spawning, which is essential to a puzzle later in the level.

antlion.gif

Enemies spawn until the hole is plugged

The player advances down another tunnel and ends up in a parking garage. This area is the next puzzle in the chapter. The parking garage has multiple floors and each floor has a hole that spawns antlions. In the last area the player learned that they can cover the antlion spawns and this area tests the player on what they just learned. This is one of my favorite set pieces in episode one and this area really shows off the excellent combat in the Half Life series. The parking garage is full of both antlions and zombies so the player has to prioritize what they want to fight. The zombies are slower but deal more damage and the antlions are fast and weak but they endlessly spawn. The cars that the player needs to block the holes get progressively farther from the holes so as the player gets closer to their goal they need to work harder to succeed. This is a good way to slowly increase the difficulty of a combat encounter as well as raise the tension.

Once the player is out of the garage they engage in some very close quarters combat with a few zombies before entering the final set piece of the chapter. The player enters a large room that is totally dark except for a light by an elevator.

2016-06-26.png

This looks promising

When the player tries to use the elevator the only light in the room goes out. The player must search the dark room for a circuit box to restore power to the elevator. As the player searches the room they will find lots of zombie bodies but very few enemies, this combined with limited flashlight creates a very tense atmosphere. The chapter culminates when the power to the elevator is turned on, the player must get back to the elevator while being swarmed by an endless supply of zombies. The area is still pitch black and it is very easy to get turned around. The players best bet is to start setting zombies on fire so there is more light to see where to go. Once the player get back to the elevator (the lone light in the entire room) the can escape the underground and the chapter is complete!

Conclusion:

The Lowlife chapter has two of my favorite set pieces in the Half Life series. This chapter is a great example of how to use lights to guide the player. The majority of this chapter is very dark and the areas where the player has to go are often lit. This shows the player where to go without leading them by the nose. Light is also used in combat since the areas are very dark and setting enemies on fire can help the player see better. The difficulty slowly ramps up in this chapter as more enemies get added as the player progresses. I feel, this level is a nod to Ravenholm from Half Life 2 since almost all the enemies are zombies and it takes place in a dark environment. The player also only has a pistol, shotgun and gravity gun and with the limited ammo provided the player has to use the gravity gun wisely to compensate for the lack of ammo (like Ravemholm). Lowlife is an awesome example of level design and I think its something that anyone who enjoys shooters should experience. That’s all for now, I would love to hear if you agree or disagree with me and let me know if there is a level you would like to see me discuss.

Update and Future Plans

Hello everyone its been a while since I have posted on this blog so I decided to give an update about whats been going on. The last two months have been very busy, I have graduated from college, moved back home, reconnected with family that I haven’t seen in over ten years, and I am looking for a job. This does not mean that I stopped designing games and levels. I have project that I have been working on that I will be talking about in a future blog post once the concept is a little further along. The other thing that I want to use this blog for is level breakdowns. There are thousands of examples of amazing levels in video games and I want to use this blog as a way to show off some of these creations. The level breakdowns will follow the follow format:

  1. Game Summery – A quick overview of the game I will be talking about
  2. Level Walkthrough – A breakdown of each area in a level
  3. What this Teaches/Tests – A good level will either teach the player something about the game or test what they already know, here I will breakdown the teaching or testing aspect of a level
  4. Final thoughts – Why is this level so compelling/memorable and any other thoughts I didn’t have time to mention.

The first level breakdown will be either tomorrow or the next day and my update on my next project will be posted next week. That’s all for now, if you have any ideas for levels you want to see broken down email me at grennana@gmail.com

Going Back to Old Designs

Introduction:

When designing games sometimes you have an idea that you flesh out and after a while you decide that the idea is not right for this particular game. The worst thing you can do in this situation is scrap the idea completely and never look back at it, sometimes the best designs come from ideas that you didn’t like initially. This recently happened to me when I was working on level designs for Space Dunk. One of my first ideas was a diamond shaped arena. The initial idea did not test well at QA, players were having a lot of trouble figuring out where to go. The level was taken out of the game but recently I revisited it and came up with two different levels based on my initial design.

What to think about when revisiting concepts:

The first two things I like to consider when revisiting an old concept are: what was my original goal for this level and what part of the original idea did not work. I like to think about my goal for the level when revisiting it because it allows me to remember why I made the design choices I did the first time I was designing the level.  This also allows you to think about better ways to achieve the same goal and it also allows you to reconsider the goal of your level and possibly change it. When you look at why a level did not work its important to look at it objectively, its easy to say a level didn’t work because it was a bad design but its much harder to look at the specifics of why it didn’t work. When I looked back at my diamond level I realized that one problem was that it was just too big, by making the level smaller it helped the players navigate the space better. The other major problem with the level that I discovered was that it was too cluttered so the players could not see the other teams goals easily. Since the goal of the game is to score in the other teams goal not being able to see the objective caused players to feel lost.

Making Changes:

The first thing I do when making changes to a level concept I am revisiting is save a new copy of the level, that way I still have the old version before I start making changes. When I was making changes to the diamond Space Dunk level one thing I did was scale the level down to help with navigation. I also rotated the entire arena and removed most of the objects out of the middle so both teams could see the goals at all times. This allowed me to drastically change the level pretty quickly and get it ready for testing again. The only was to find out if the changes you make are for the better is to test them.

Conclusion:

Looking at old concepts is a good way to inspire yourself but it is important to remember that not every idea you have is going to be salvageable, this does not mean that you can’t learn from the concept. The first few levels I ever designed and created were really terrible but I learned a lot from making them and I learned a lot more from revisiting them and playing them. When you return to an old project or concept and you have distanced yourself from the feelings you had towards it when you were first making it you have the potential to learn a lot from the mistakes and the successes from your past.

Using Sounds for Player Feedback

Introduction:

I have been working on creating sounds for Space Dunk recently, when designing sound for a game you have to make sounds for every interaction the player will encounter. Sounds are one of the ways that players receive feedback from the game, and good feedback can be the difference between a average game and an amazing game. Feedback does not only have to be visual, sounds can also be used to provide the player with feedback as long as you don’t throw too many sounds at the player at once.

Examples of Excellent Sound Feedback:

There have been several games with great sound design recently one of the best examples is Alien Isolation. This horror game uses sound to help raise the tension of being chased through a spaceship by an alien. The game relies on the sound to help set the mood of being hunted without the game having to show you the monster. The Halo series is another example of games with phenomenal sound design. The weapons that the enemies use against you all have very unique sounds so the player can tell what weapons the enemies are using without even seeing the enemies, this is also true for the enemy types the player can tell what enemies are around based on their dialog. When the player is in critical health a very subtle beeping sound warns the player that they can’t take much more damage, this sound is not too loud so that the player can hear all the other important sounds. This is one of the hardest parts of sound deign, making sure that the sounds don’t overpower each other. In any game there are certain sounds you want the player to hear every time however, you don’t want other feedback sounds to get drowned out. If a sound you are using to give the player feedback can’t be heard then the player is not getting the feedback they need.

Space Dunk Audio Feedback:

While working on the auditory feedback for Space Dunk I have been using QA testing to find out if any of my sounds are too loud or too soft. The first time I created a sound for the ball being thrown it was so quiet that if there was any other sound being played when a ball was thrown the players could not hear the throw sound. This is one of the first projects I have worked on where the sound wasn’t designed as an afterthought this has allowed me to get feedback on the sounds from QA and this has resulted in sounds that work together much better.

Deciding where to Spawn Players

Introduction:

When designing a multiplayer level one of the things that needs to be taken into consideration is where the players spawn. This is something that people think is simple however player spawns can make or break a level. If a player is constantly spawning too far away from the action they have to spend time getting to the action, if they are constantly respawning this can be very frustrating. On the other hand it can be just as frustrating to the player to spawn too close to the action, if they respawn too close to the action they have a chance to be killed right as they spawn which is (in my opinion) one of the most frustrating experiences in gaming.

Space Dunk Spawns:

When designing levels for Space Dunk the spawns constantly get moved, the players can’t die so respawning is restricted to after a team scores and the game resets. This poses its own set of problems, since the players respawn after a goal is scored so all the player have to respawn at the same time. When I was creating the half-court level I originally had the spawns on the opposite side of the map from the hoop. The problem with this method was the player would respawn and then immediately be able to grab the ball and easily make a shot. This turned the level into a race to see who can get the ball first and which ever team reached the ball first was almost guaranteed to score. After testing the map we decided to move the spawns to the same side as the hoop, this had the players initially running away from the hoop to get the ball then having to run back to the hoop to score.

Conclusion:

When deciding where to place the spawns remember that QA testing is the best way to find out if the spawn locations are good. The nice thing about spawn locations is that they are easy to move and test in different locations.

Leading Players Through a Level

Introduction:

One of the biggest challenges in level design is create an environment that is easy for the player to navigate. When creating a level you know what the layout is so it can be very easy to think that a level is easy to navigate but when it goes to testing players get lost easily. This not only shows the importance of QA testing it also presents the question: How does one lead a player through a level? There are several ways to give a player hints about where to go in a level without blatantly telling them such as: lighting, enemy placement, and items. Now lets explore each of these ways to lead the player through a level.

Lighting:

Lighting is important in any game, lighting can be used to generate a certain mood and it can be used to aid in player navigation. Horror games often use lighting to build mood and also lead player through an area. The eye is naturally drawn to lights and when a player is in a dark area they will move toward a lit area. A great example of this is in the Half-life 2 level Ravenholm. This area is a horror themed level where the player has to fight through a zombie infested town.

6063-106730-ravenholm02jpg-468x.jpg

Half-life 2 Ravenholm- The player first meets Father Grigori

The picture above shows the first time the player meets Father Grigori, a survivor who helps the player through the town. The player is drawn to this area due to the huge bright fire in front of the building. Above the fire there is a very bright light coming out of the open door where Father Grigori appears. This is intended to draw the players eye to where Grigori shows up, this is important because the level designer  uses this scene to teach the player that there are traps in the town that the player can use against the zombies.

Enemy Placement:

The placement of enemies can be used to guide players as well, however since the enemies are going to move towards the player this method does not always work. An amazing example of this being used well is also in Ravenholm. Immediately after the player meets Father Grigori (shown in the picture above) the player walks past a boarded up room.  As the player walks by two zombies start breaking through the boards and attacking the player. This draws the player to the room where the zombies just came from, and in that room the game teaches the player that they can turn on gas in certain areas to create fire. This is important later in the level, when the player has to turn off some gas to move on.

Items:

The placement of items in a level can help lead a player through an environment. A rule of thumb I use in games is that if I think I am getting turned around I start to scan the area of pick-ups, if an environment is picked clean I assume I have been there already. The Unreal Tournament series used very small heath pickups to show players different paths they can take through a level. Another example is in Bioshock, when the player acquires the shotgun. The weapon is placed in the middle of the room where the player can easily see it from the doorway. This causes the player to go into that room and get the weapon (although they are ambushed immediately after).

Conclusion:

There are many different ways to give the players hints on how to navigate the level or area. There are many ways that I didn’t get to discuss such as sound effects and environment clues. The biggest problem with levels that are not fun to play is that they are frustrating to navigate. A great level shows the player where to go without directly telling them, an amazing level subtly tells the player where to go without them realizing it.

Asymmetric Levels

Introduction:

Last week I talked about symmetric level design so this week I decided to look at the other side of the coin. Asymmetric levels offer unique design challenges, the biggest pit fall is having one side of the map be more desirable then the other. This can be a big issue in a team based game type, if one team spawns on a side with better weapons or power-ups the balancing will be off and one team will have a much easier time winning. If an asymmetric level is balanced well it can be a very interesting experience for the player, since each side of the map is different the players must come up with different strategies depending on where they spawn.

Asymmetric Maps:

tumblr_inline_mv8rdfywgg1somwzy.png

Escalation – Gears of War 1

The map Escalation from Gears of War is an excellent example of fantastic asymmetric level design. The map takes place on a large stair case one team spawns at the bottom and has to work their way up the stairs, the other team spawns at the top of the stairs and works their way down. This map may seem unbalanced but Epic Games used weapon spawns and the geometry of the level to keep things balanced. The team that starts at the top (the Estate Spawn in the picture above) has the advantage of being able to see the surrounding area better as well as superior firing positions. Since Gears of War is about taking cover during combat the players at the top of the map have positions that allow them to shoot down at the other team allowing them to get around the attacking teams cover. Their elevated position also makes it hard for the team coming up the stairs to hit the opposing team. The team that is advancing up the stairs (the team that starts at the Allfather Spawn) is given two sniper rifles to help even the odds. The team moving up the stairs has almost all the weapons spawn close to them, this helps them fight against an enemy with a superior position. The sparsity of weapons is very intentional, besides the sniper rifles there are only three other weapon pick-ups two of which are pistols and the last is some grenades. This makes the sniper rifles very powerful on this map since there aren’t any weapons to counter the snipers. Gears of War’s multiplayer works on a round system, when everyone on a team is killed the round ends and the teams trade spawns. This makes it so both teams have opportunities to take advantage of the high ground and the snipers respectively.

Conclusion: 

Asymmetric maps can live and die based on the balancing, its very compelling as a player to have two different sides that require different strategies to attack and defend. The biggest challenge that one must overcome when designing a asymmetric level is making sure one side is not more overpowered then the other, if one side is clearly at an advantage nobody is going to want to start on that side which can lead to players quitting early.

Symmetric Levels

Introduction:

There are many different types of levels in video games, two very popular types of multiplayer levels are Symmetric and Asymmetric. Both of these types of maps have advantages and disadvantages depending on what kind of experience you want your players to have. Symmetric maps are very common in team based objective game types (such as capture the flag) since neither side will have an advantage due to where they spawn. This post will explore symmetric maps and the ways they can be compelling.

Symmetric Maps:

ThePit-HeatMap.jpeg

Figure 1 Halo 3 – The Pit 

The Halo 3 map The Pit is one of my personal favorite symmetric maps of all time, This map is a great example of why symmetric maps are so compelling. This level was used for both deathmatch and objective game modes and was widely considered one of the best maps in Halo 3. The areas that both teams spawn in (represented below by the red and blue boxes) offer the players three major routes for player to get to the opposing teams base, there are more ways to get across the map however but the examples I am going to talk about are the most direct.

The Pit Spawns .jpg

Figure 2 The Pits Spawning Areas

The spawns offer more then just a base for the teams to start in, both teams have sniper rifles at the towers beside their spawns. This allows skilled players to quickly begin an offense play or a defense play. The areas in front of the sniper towers are very open however there are many safe ways to maneuver around snipers. Each side also has a shotgun that can be used to defend in the close quarters of the spawn area.

The Pit Common Routes.jpg

Figure 3 Routes

Figure 3 shows three of the many routes to get from one side of the map to the other. The purple path takes the player from the base past a sniper rifle, they then have two options: take the lower path witch is a long hallway with no cover or take the upper path which is a small square room. The hallway route is dangerous but also has a Overshield (a health power up), the hallway route is very quick and direct but it leaves the player exposed to a lot of enemy fire. The room route has very close quarters and also has an energy sword (one of the most powerful close quarters weapons in the game), this route offers more cover but it can be easily held down by one player with a close quarters weapon.  The Green path shows the routes that bring the player through the center of the map. The center of the map has a rocket launcher in the middle of a hallway, this area is easy for both sides to see and is often the area where the first kill of the game happens. The other hallway next to the rocket launcher has an invisibility power up which is very useful in objective game types. The blue route is the quickest way to get to the other side of the map but it requires the player to run at the other teams sniper tower this is very dangerous and there is not much cover available. This route has a few weapons but no super powerful ones, this route is more about speed then getting equipment. The thing that these routes all have in common is the center of the map has weapons and power ups that the players will fight over. The best symmetric maps (in my opinion) create reasons for the players to fight in the center of the map.